Vantec EZ-Swap MRK-102FD / MRK-200ST Removable Hard Drive Rack
![]()
![]()
![]()
![]()
![]()
![]()
![]()
![]()
The hard drive in your computer is arguably its most valuable component. While remarkably affordable, installing Windows and the other applications and data you use is typically a time-consuming undertaking. We usually allow several days to get a new computer up and running.
If you keep sensitive files on your system – customer records, personal information, trade secrets or just embarrassing photographs involving feather boas – your hard drive is also your computer’s greatest liability. Should someone make off with your computer, they’ll have all your files as well.
Password protecting your computer will typically deter a good data thief by as much as fifteen minutes.
The best way to prevent your hard drive from being stolen – or your data from being destroyed by a fire or other disaster – is to put it somewhere else when you’re not using it. The ideal “somewhere else” would be a fire-resistant, burglar-proof safe.
Unwiring your computer and stashing it in a safe every time you leave the building arguably isn’t a workable solution.
The Vantec EZ-Swap removable hard drive rack looks a lot more like a workable solution. It will allow you to remove your hard drive from your computer and store it somewhere out of harm’s way, far from the madding crowd and beyond the reach of the unenlightened, unwashed and unthinkable. It’s easily the best such product we’ve seen to date.
Sadly, this shouldn’t be regarded as an unqualified endorsement.
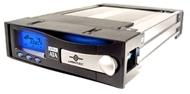
The EZ-Swap removable hard drive rack consists of a cage that resides in one of the otherwise unused drive bays of your computer – you’ll need a free drive bay to house it – and a box that slides into it, wherein lurks your hard drive. The EZ-Swap system will work with pretty much any 3.5 inch hard drive. You can use the one that came with your computer.
The EZ-Swap drive rack comes in two flavors – the MRK-102FD for older IDE drives and the MRK-200ST for current SATA drives. If your PC was built in the past few years, it probably uses the latter. You can determine which drive type you have with a screwdriver and a flashlight – IDE drives use ribbon cables about an inch and a half wide to interface them to their host computers. SATA drives interface through a much narrower cable.
SATA Version
The MRK-200ST version of the EZ-Swap drive rack is considerably easier to install than the IDE version, to be discussed below – largely, I suspect, because SATA drives have fewer options and variables to contend with. There’s only one jumper to set, to determine whether the drive will be a master or a slave.
One oddity of the SATA drive rack is that it uses a SATA data connector, but an old-style four-pin nylon power connector. SATA drives use a smaller custom power connector. In newer PCs with few spare old-style power connectors, this could be an issue, as it was in one of our installations. We found a power splitter at the back of a desk drawer to resolve it.
The SATA data connector was also a minor issue – if the intended host computer for this device uses an angled data connector at the drive end, it will probably just fit in the EZ-Swap rack, as the back of the electronics cover is a few millimeters deeper than it should be. Ours was left at a slight angle.
The instructions for the SATA drive rack were somewhat more professional and comprehensible than the ones for the IDE version, to be robustly flamed in a moment, but they still presuppose a reasonable familiarity with the inner workings of personal computers.
If you’ve never had the cover off a PC, installing an EZ-Swap drive rack might not be the best place to start. Users with reasonable eye-hand coordination and detectable success in answering questions like “which of these objects is a hard drive” should have little difficulty.
IDE Version
Mounting the MRK-102FD IDE EZ-Swap removable hard drive rack in a desktop PC could be almost effortless, although it wasn’t for any of the systems we installed these things in. Most devices intended for use a PC drive bay are designed with bolt holes for mounting them both in the sides of the case and underneath. In theory, only the ones in the sides should be required – in practice, many commercial PCs use the bottom mounting holes to allow their drive bay retaining systems to work like a drawer.
The EZ-Swap removable hard drive rack case is slightly smaller than, for example, a conventional CD-ROM drive, making its side mounting holes a bit tricky to use for computers that hold their drive bay devices in with slides. It has no bottom mounting holes at all.
Not to put too fine a point on it, securing EZ-Swap racks in the PCs we bought them for was a pig. We ultimately resorted to hot-melt glue for some of them, which is about as far from an elegant solution as solutions can possibly get without involving one or more dancing hippopotamuses.
A lesser concern to be aware of in installing one of these things is that the drive case is unusually long. We were able to fit them into all the machines they were intended for, but in several cases, with millimeters to spare.
Installing and configuring the MRK-102FD EZ-Swap removable hard drive rack was made somewhat more difficult than it probably had to be by the inclusion of one of the most deplorable instruction sheets we’ve encountered in any piece of technology made later than 1985. The whole works was a single sheet of paper. Half of the instructions had to do with configuring the remarkably sophisticated monitoring firmware in the drive rack. The leftover steps that dealt with installing the hard drive and setting its jumpers were decidedly terse.
The first issue you’re likely to encounter in reading the instructions for the IDE version of the drive rack is that they only deal with IBM and Seagate hard drives. Safely buried at Vantec’s web page are jumper settings for Western Digital, Maxtor, Seagate and Hitachi drives as well, but you’d need to go looking for them.
Once the hot-melt glue dried and we’d figured out how to set up the EZ-Swap’s jumpers, the whole works went together reasonably easily. All of ours worked first time out of the box. The plastic construction of the drive bay lock seemed somewhat flimsy, and its insistence on the use of its mechanical key lock to disengage the drive for removal remains inconvenient. Those little tubular keys aren’t going to slow down any potential thief with more than two working fingers.
As I noted earlier, the EZ-Swap removable hard drive rack includes internal logic to monitor the temperature of the hard drive stored in it, and a small auxiliary fan to keep it at something reasonable. The temperature and the state of the fan are displayed on a front-panel LCD screen. The screen will also show you when the drive is accessing data.
It’s probably worth noting that even with an EZ-Swap rack around it, your IDE hard drive will not be hot-swappable. You’ll need to power down your computer to remove it.
In one sense, the EZ-Swap removable hard drive rack does what it says on the box – it will make your system’s hard drive removable, and allow you to lock it up when it’s not in use. Once it’s installed, it works well. Installing it, however, is not for the faint of heart. In that its installation issues are the result of somewhat questionable design elements and sloppy instructions, this is a toy that could have been a lot more fun to play with had its creators sent it back through the CAD software one more time.