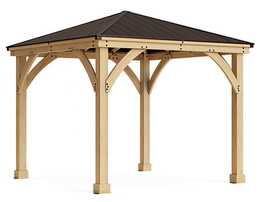
Yardistry 10 x 10 Gazebo
![]()
![]()
![]()
![]()
![]()
![]()
![]()
![]()
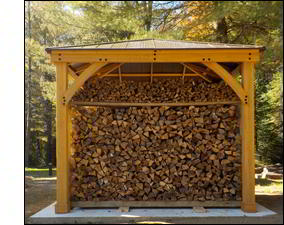
We have experienced moments of guilt over our Yardistry gazebo. Most of the reviews of this structure have been written by people using it to shelter their barbecues or enhance wedding receptions. We installed ours as a firewood enclosure. The option to hang strings of lights under its eves will be forever unappreciated.
Our gazebo replaces a venerable Canadian Tire temporary shelter, which survived a decade of brutal winters. Admittedly, one of the attractions of a permanent wood shelter was the prospect of not having to assemble it each autumn, reverse the process each spring and sprint for the yard with a broom every time a dozen flakes of snow entrenched themselves upon its roof.
To its credit, the Yardistry gazebo is a seriously robust structure when it’s complete. The process of getting it complete, however, can prove somewhat nettlesome. This is not a kit for the faint of heart, the timorous of limb or the slight of power tools.
It also requires a degree of imagination during the interpretation of its assembly instructions.
Potential owners of a Yardistry gazebo will do well to download its assembly manual from the Yardistry web site and read it… carefully. It offers a realistic insight into the challenges involved in completing the gazebo. There are also a number of ancillary YouTube videos – both created by Yardistry and filmed by independent installers – to expand upon its somewhat anorexic instructions.
As a final prefatory observation, most corners of civilization have professional garden structure installers who will arrive at your digs and put one of these things together for you, should you find the prospect of doing so yourself unworkably daunting. We didn’t have recourse to outside help, but we were born for adventure.
Grounded
Yardistry hails from Waterloo, Ontario. They create a variety of garden structures, including gazebos, pergolas and greenhouses. Despite their being headquartered in a country that’s pretty much trees from one shore to the next, their stuff appears to be manufactured in China. It’s by no means badly made, but having to send wood half way around the world to Canada seems a bit odd.
Our Yardistry gazebo was available from Home Depot, Costco and directly from Yardistry itself. We chose the latter option, in that the price of it included free delivery. If you’re not in a raging hurry for one of these structures, all three of the aforementioned sources have periodic sales.
Our gazebo arrived on a truck in three very large boxes strapped to a wooden palette. While the complete palette required a forklift to move, the individual boxes could be carried by two people. They served as a worthwhile introduction to the experience of assembling the gazebo – everything about this project involves some serious lifting.
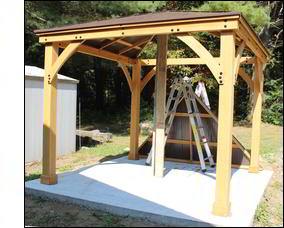
Before you unpack the Yardistry gazebo’s numerous components, you’ll want to establish where the structure will reside. It cannot simply be assembled on your lawn and left to stand unsupported. Some users of these things bolt them to existing wooden decks. If you choose to be among them, be advised that the final gazebo is fairly heavy, and it can represent a substantial wind load. Be sure your deck is sufficiently robust to support it.
Our firewood enclosure was destined for a more consequential base – we planned to have it reside upon a concrete pad.
Pouring concrete is an adventure all by itself. Despite the dubious advice of innumerable authorities on YouTube, you’ll need to assemble wooden forms and install steel reinforcement before you call in a cement mixer – either concrete mesh or rebar. You’ll also need stone under the concrete to keep any ground water that sneaks down there from degrading it over time.
Pay attention to the various discussions of wet-curing concrete – correctly applied, wet curing will avail you of a substantially stronger pad for virtually no extra cost and very little additional work.
This being the age of inflation, when the dust had settled, our concrete pad cost us almost half as much as the entire gazebo kit. This said, it’s definitely not going anywhere.
 The Yardistry gazebo consists of lots and lots of cedar parts, and several bags of hardware to connect them together. There are also aluminum roof panels… but let’s not go there just yet.
Prior to assembling our gazebo, we decided to apply waterproofing wood stain to all its wooden components. While a time-consuming and somewhat arduous prospect, doing so should result in a substantially more durable structure. Considering what it cost and what it would ultimately entail to assemble, we anticipated our gazebo lasting for a very, very long time.
The first task in building the gazebo is to fabricate the cross-beams that form its horizontal supports, and attach mounting brackets to its four upright posts. All its wooden parts are numbered, and all its hardware comes in clearly labeled plastic bags. The instructions for this stage of the opus are pretty lucid, and you’d have to put some serious effort into performing these steps incorrectly.
The ancillary videos available to assist with the construction of the gazebo suggest that it can be crafted with a few hand tools and a cordless electric drill. Perhaps it could, but the process would be decidedly onerous, and would likely leave its owners with a lot of blisters. At the very least, you’ll want to augment your drill with an impact driver. There are innumerable – decidedly large – bolts to tighten in building a Yardistry gazebo. We used a DeWalt DCF887B twenty-volt impact driver, finer than which cannot be had.
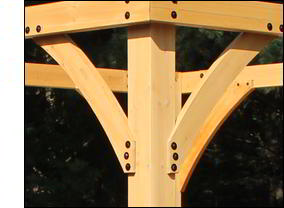
The cross members of the gazebo are actually assembled from several smaller pieces of cedar that get bolted together. They might appear to have been handled thus to facilitate getting all the components of the structure into packaging of a reasonable size. To their credit, once they’re locked down, they’re surprisingly strong, and consisting of several discrete lengths of wood, should be ill-disposed toward warping.
The four uprights of the gazebo are actually hollow. While they’re decidedly substantial, they don’t weigh nearly as much as they look like they should.
With the components of the lower portion of the gazebo completed, it was time to put the upright posts and their cross members together to form a standing structure. Yardistry’s instructions insist that four people are required to complete this stage of the assembly. We were two people short.
As we were to discover, it’s possible for two people to build the entire gazebo without significant risk of catastrophe or detached extremities through the application of a some stealth and planning.
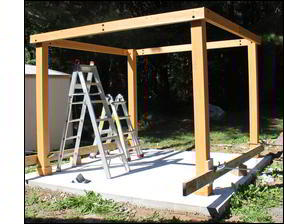 We assembled two walls of the gazebo, essentially inverted ‘U’s, and stood them in their correct positions on our concrete pad. We then secured them in place using two of the two-by-six planks that had served as concrete forms, held in place with bar clamps. This kept the whole works upright and reasonably safe long enough to install the remaining two sets of cross-members.
Once it was complete, we secured the gazebo to its concrete pad using large Tapcon concrete screws. Drilling into concrete pretty much necessitates the use of a hammer drill. Fortunately, we had one. Unfortunately, it dated well back into the twentieth century, and was only useful as a hammer if it was swung very hard.
It proved impractical to rent a suitable hammer drill, as the few that were available we both too large to get close enough to the legs of the gazebo, and so costly to hire as to make buying a drill entirely preferable. We ordered a Bosch 1191VSRK, which worked flawlessly.
While Amazon didn’t sell us the gazebo per se, it proved to be the supplier of pretty much everything we needed to complete it.
As an aside, if you build a Yardisry gazebo and you need to drill holes in something to bolt or screw it in place, temporarily remove the wooden trim around each of the upright posts adjacent to the mounting brackets. Doing so will avail you of enough of additional space to accommodate a modest-size hammer drill, such as the one we used, vertically beside each post
And Then, The Roof
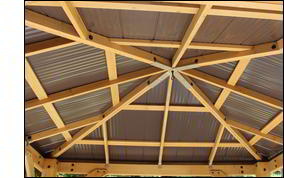 Most of the work and all the genuine terror of assembling a Yardistry gazebo is vested in its roof. The roof consists of four triangular structures built of cedar parts and skinned with pre-cut – and happily, pre-painted – aluminum panels. The roof sections are intricate, modestly complicated and an area in which the gazebo’s printed instructions could have seen one more pass though their word processor. The somewhat simplistic graphics and terse written descriptions of the process of assembling the roof panels makes creating them more challenging than it arguably needs to be.
We built the roof panels on a large improvised table consisting of two sawhorses and the planks we’d used as concrete forms – it would be decidedly inadvisable to try to put them together on the ground. The first one took some head-scratching to determine how all its pieces fit together.
Patience is also a tool.
Once the four roof panels have been completed, they need to have their aluminum covers and flashings installed. This is probably the aspect of the gazebo kit most likely to go sideways, and you’ll want to spend a while making sure you have everything correctly placed before you start winding in screws. Positioning the large roof panel sections so everything lines up correctly at the section edges deserves some serious attention.
Constructing the roof is hampered to some extent by the roofing screws included with the gazebo kit. They’re decidedly low-end – they lack backing washers, and the paint applied to them so they match the color of the roof panels is often uneven, making them difficult to fit into a nut driver. We replaced them with proper roofing screws for a few areas of the panels, with much better results.
Attaching the roof panels is another area in which you might want something other than the tools suggested by Yardistry’s instructions. It’s important to get the roofing screws snug, but not so tight as to crush the ribs of the panels. Performing this task with a cordless drill is arguably possible, but it would entail serious concentration. We used dedicated cordless screwdrivers, with their torque settings dialed back such that they couldn’t over-tighten the screws.
Installing the roof panel flashings was still more nettlesome – they don’t come with quite enough screws and corresponding screw holes to ensure that the edges of the flashing won’t buckle. This took some serious work and profanity to get right.
As an aside, the aluminum panels of the gazebo arrive with plastic film attached to both faces. It needs to be peeled off before the panels are installed. Allow considerable time for this step, and a large garbage bag to contain the left-overs.
The true conquest of the Yardistry gazebo is not in assembling its roof panels, but rather, in installing them atop the structure. Once again, we were two people short of the four recommended by the instructions and its accompanying video. This said, the procedure touched on in the instructions looked somewhat fraught. We evolved our own.
The gazebo roof panels are remarkably light – they’re just large and cumbersome. After some thought, we devised a procedure to elevate them skyward and keep them in place long enough to get them bolted together. It involved a ladder and two of the two-by-six planks from our concrete pad. The planks were cut to lengths of 107 inches, with a notch installed in one end.
 We stood each of the roof sections on its end just outside the shelter. One of us climbed a ladder inside the shelter and pulled the section up, while the other pushed. Once each roof panel hand been pulled up and over its horizontal cross member, the first person could walk inside the shelter and prop it up with one of the two-by-sixes.
We too were shocked when this worked. Nothing fell, nothing disintegrated and the whole roof was in place in about half an hour.
Bolting the roof together really calls for an impact wrench. This portion of the assembly entails a lot of bolts, and you’ll want to get the supporting fasteners in place fairly quickly if your roof panels are being held up by two sticks and a humid day.
It’s arguably worth noting that the Yardistry instructions are a bit vague about the hardware to be used in connecting the four roof panels. Read them carefully, and give the whole works some thought before you slide a battery into your impact wrench. Pay attention to the lock washers.
We were pleasantly surprised to discover that once the roof was bolted together, it fit pretty much where it was supposed to atop the gazebo structure. All the bolt holes lined up, the brackets were where they were supposed to be and the final few steps of assembling the gazebo flew by without incident.
While it’s possible to assemble the gazebo without one, a DeWalt DCD740B right-angle drill proved helpful getting some of the less accessible bolts in place.
The most nettlesome aspect of completing the Yardistry gazebo is easily its most innocuous component. The cap that covers the opening at the peak of the roof is decidedly funky, and somewhat difficult to install. While we did eventually tease it into place, it doesn’t quite sit as it should to this day.
For the Ages
 The Yardistry 10 x 10 gazebo is a well-engineered structure, and once it’s complete it feels like it could survive the end of civilization. Assembling it isn’t unduly challenging – it’s a singular ego boost when it’s done.
Once we’d returned all our power tools to the basement… and disposed of a small mountain of cardboard that had hitherto confined the gazebo’s parts… we installed its firewood racks and prepared it for the coming winter. Four tarps from Amazon completed its boreal preparations.
Our previous firewood shelter went to the local Habitat for Humanity ReStore.
There are a number of alternatives to the Yardistry gazebo – most of them made of folded sheet metal – that are slightly less expensive and probably a bit easier to put together. This is the most attractive and arguably the most robust garden gazebo to be had, however, and it’s well worth what it cost and the work involved in constructing it.